
A No-Stress Approach to Classic Risotto: Creamy Results Without Constant Stirring
Risotto, Without the Intimidation
Risotto is one of those dishes that many home cooks admire from afar. It’s often described as difficult, time-consuming, and dependent on near-constant stirring. That reputation can be enough to stop people from trying it at all—especially on a weeknight, when dinner needs to be both comforting and manageable.
But risotto doesn’t have to be a kitchen marathon. With a few smart choices—warming the broth ahead of time, giving the rice a quick toast, and letting most of the cooking happen covered—you can make a classic, creamy risotto with far less effort than you might expect. The end result still delivers what people love about risotto: tender rice, a rich and cohesive texture, and a savory finish from Parmesan, butter, and black pepper.
What Makes This Method Easier
Traditional risotto techniques often emphasize adding hot broth little by little while stirring frequently. This approach keeps the process simpler by changing the rhythm: after the rice is toasted and the wine is absorbed, you add about three-quarters of the broth at once, cover the pan, and let it simmer for 10 to 15 minutes until the rice is just al dente. Only then do you uncover and finish with smaller additions of broth, stirring as needed until the rice becomes completely tender.
The benefit is practical: you spend less time hovering over the stove, yet still get the creamy texture people associate with a well-made risotto. It’s a method designed to reduce stress without sacrificing the qualities that make the dish feel special.
Start With Warm Broth (It Matters)
Before you begin cooking the rice, get your broth ready. Add it to a pot and bring it to a simmer so it’s hot and waiting when you need it. Once it’s steaming, reduce the heat to low, cover the pot, and keep it warm.
This step may seem small, but it supports the smooth flow of the recipe. Adding warm broth helps the rice cook evenly and keeps the overall temperature steady as you build the dish.
Build Flavor in Stages: Butter, Onion, and a Light Toast
In a large skillet, melt butter, then add finely chopped white onion and a bit of salt. Cook the onion, stirring occasionally, until it becomes soft and translucent. This is your base: gentle aromatics that set up the risotto’s savory backbone.
Next comes the rice. Add Arborio rice to the skillet and toast it for a few minutes in the butter and aromatics. The goal isn’t to brown the rice aggressively; it’s a brief, light toast. You’re looking for grains that are lightly toasted and translucent around the edges—just enough to deepen flavor and prepare the rice for simmering.
Deglaze With White Wine, Then Let It Absorb
Once the rice has been toasted, add white wine and stir to combine. Continue cooking and stirring until the liquid is fully absorbed. This stage is straightforward: the wine gets incorporated into the rice, adding another layer of flavor before the broth takes over as the primary cooking liquid.
The Key Shift: Add Most of the Broth, Cover, and Simmer
Here’s where the method becomes noticeably more relaxed. Instead of adding broth in small increments from the start, you add three-quarters of the warm broth to the skillet, cover it, and let it simmer for 10 to 15 minutes. During this time, the rice cooks until it’s just al dente.
Covering the pan allows the rice to cook efficiently while you step away for a moment. You’re not abandoning the dish—you’re simply letting the heat and steam do more of the work upfront.
Finish Uncovered: Add Remaining Broth Gradually
Once the rice reaches the al dente stage, uncover the skillet and finish the risotto by adding the remaining broth a half cup at a time. Stir as each addition absorbs, then add more until the rice is completely tender. This final phase should only take a few more minutes, and it’s where you can fine-tune the texture.
By saving the incremental additions for the end, you still get the familiar risotto finish—creamy, cohesive, and spoonable—without having to stir constantly from the very beginning.
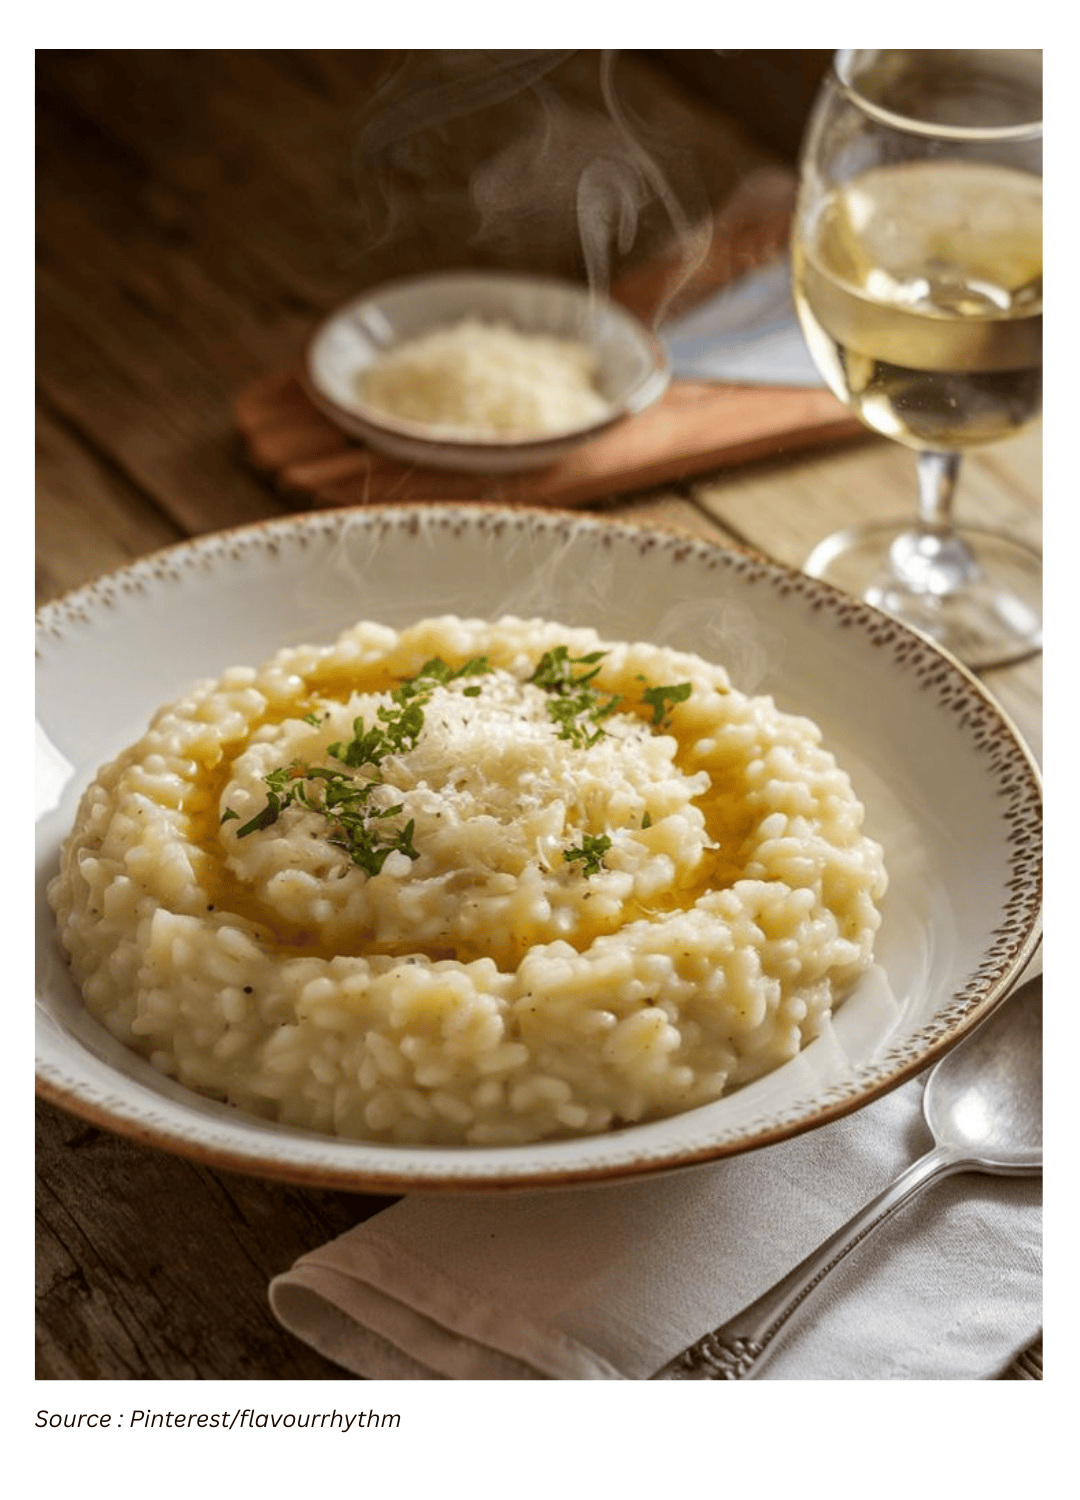
The Finishing Touches: Parmesan, Black Pepper, and Butter
When the rice is tender, remove the skillet from the heat. Add grated Parmesan, black pepper, and the remaining butter. Stir until the cheese and butter melt into the risotto, creating a glossy, rich final texture.
At this point, taste and adjust seasoning with more salt and pepper as needed. Then serve right away for the best texture.
Ingredients You’ll See in This Classic Version
This is a classic, straightforward risotto built around a short list of familiar ingredients. The recipe relies on pantry-friendly staples and a few key components that deliver the signature creamy finish.
- Arborio rice
- Low-sodium chicken broth (store-bought or homemade)
- Butter
- Medium white onion, finely chopped (about 1 1/2 cups)
- White wine
- Parmesan, finely grated (about 1 1/2 cups)
- Salt and black pepper
While the full ingredient list and exact measurements belong in the recipe itself, the structure is consistent: warm broth, a butter-and-onion base, a brief rice toast, wine absorption, covered simmering, then a Parmesan-and-butter finish.
How It Tastes—and Why It Works for Both Weeknights and Guests
This style of risotto lands in a sweet spot: it’s as comforting as it is presentable. The texture is creamy and satisfying, and the flavor is savory without being complicated. Parmesan and black pepper do a lot of heavy lifting at the end, turning simple ingredients into something that feels complete.
That balance is part of why risotto remains so popular. It can be a dependable comfort food staple—something you can rely on when you want a warm, filling dinner. At the same time, it still has the feel of a “fancy dish,” making it a strong option for dinners where you want to impress without taking on an all-day cooking project.
What Home Cooks Notice When They Try It
One of the most common reactions to a simplified risotto method is surprise—especially from people making it for the first time. As one home cook put it: “First time making risotto and everyone loved it, including me! I was impressed with how easy this recipe was to follow since I've always been told this is an easy dish to mess up. I'm looking forward to trying it again soon!”
That response captures the main appeal here: risotto can feel intimidating until you see how approachable it becomes with a clear, structured method.
Ways to Serve It: Proteins That Pair Well
A classic risotto like this is more than a standalone dish—it’s also a versatile base. It pairs well with a wide range of proteins, and it’s particularly well-suited to seafood.
- Shrimp
- Lobster
- Chicken
- Sausage
- Mushrooms
- Beans
The beauty of this risotto is that it doesn’t compete with toppings. Instead, it provides a creamy, savory foundation that can support both richer additions (like sausage) and lighter ones (like shrimp or beans).
Side Dishes: Keep It Light and Vegetable-Forward
Risotto is rich by nature, so it often benefits from a side that brings freshness and contrast. Vegetable-forward sides are a natural match, especially when you want the meal to feel balanced.
- Salads
- Oven-roasted asparagus
- Brussels sprouts in a cacio e pepe style
These kinds of sides complement risotto without adding heaviness, and they make the plate feel more complete—particularly if you’re serving the risotto as the main event.
Variations to Keep It Interesting
Once you’re comfortable with the basic technique, risotto becomes a template you can adapt. There are many variations on the classic dish, and they can be adjusted further depending on what you serve alongside them.
Some popular directions include:
- Mushroom risotto, for an earthy, savory variation
- Shrimp risotto, for a seafood-forward option
- Pumpkin risotto, for a seasonal twist
- Vegan charred lemon-asparagus risotto, for a bright, summery variation
Even if you stick to the classic Parmesan-and-black-pepper finish, the same cooking method can support different add-ins and seasonal choices.
Storage and Reheating: Best Texture vs. Best Flavor
Risotto is at its absolute best right after it’s made, particularly when it comes to texture. That freshly finished creaminess is part of the dish’s signature. However, the flavor can still hold up well on day 2 and day 3.
To store leftovers, refrigerate the risotto in an airtight container. For reheating, gently warm it in a covered container in the microwave. Keeping it covered helps prevent it from drying out too quickly while it heats.
A Bonus Idea for Leftovers: Turn It Into Arancini
If you want a more transformative way to use leftover risotto, there’s a classic option: roll it into rice balls and turn it into arancini. This approach turns yesterday’s risotto into something that feels like a new dish—especially appealing when you want a “real treat” rather than simply reheating a bowl.
The Takeaway: A Foolproof Rhythm You Can Repeat
The main secret here isn’t a rare ingredient or a complicated technique. It’s the rhythm of the process: warm your broth, build a base with butter and onion, lightly toast the rice, let the wine absorb, then cook most of the way covered before finishing with smaller broth additions and a rich Parmesan-butter stir-in.
That structure makes risotto feel less like a test of patience and more like what it should be: a reliable, comforting meal that also happens to be worthy of company.
If you try this method, adjust the final seasoning to your taste and serve it right away. And if you make it again later with a different protein or seasonal variation, the same core technique will still carry you to a creamy, satisfying result.