
Chocolate Molten Lava Cakes: A Rich, Romantic Dessert That’s Easier Than It Looks
A decadent dessert with special-occasion appeal
Chocolate molten lava cakes have a reputation for being the kind of dessert you order when you want something unmistakably indulgent. They arrive looking neat and composed, but the moment a spoon breaks through, warm chocolate spills out in a glossy stream. That contrast—an exterior that’s set and cake-like with a center that stays molten—makes the dessert feel dramatic and luxurious.
They also happen to suit moments when you want a dessert to feel a little more meaningful than everyday sweets. A romantic dinner at home is an obvious fit, and occasions like Valentine’s Day often call for something that looks impressive without requiring a complicated, all-day baking project. The good news: despite their restaurant-style presentation, molten cakes can be surprisingly manageable in a home kitchen.
Developer Katie Rosenhouse describes the fun of molten cakes this way: they look difficult, yet they’re “surprisingly simple to pull together,” and they’re “even easier to customize based on flavors you love.” Her version is designed to be rich and gooey—“over-the-top delicious,” as she puts it—while still being approachable enough for home cooks. It’s also scaled to make six individual servings, which means it can work for a dinner party as easily as it can for a date night.
What you need: a short ingredient list plus optional extras
Part of the appeal here is how few ingredients stand between you and a tray of warm cakes. Many of the essentials are common fridge or pantry staples, and the optional additions are there if you want to turn the dessert into a plated, restaurant-style experience.
- Core ingredients: butter, all-purpose flour, bittersweet chocolate chips, vanilla bean paste, eggs, granulated sugar, kosher salt
- Optional pairings and garnishes: chocolate hazelnut spread or fruit jams (for sauces or plating), fresh berries, confectioners’ sugar, ice cream for serving
The base formula keeps the focus on bittersweet chocolate as the main flavor. The optional ingredients, meanwhile, let you decide how simple or elaborate you want the final presentation to be—anything from a quick unmold-and-serve to a fully garnished plate with sauce, berries, and ice cream.
Equipment and setup: ramekins, oven heat, and a little prep
Molten lava cakes are typically baked in small ramekins, which help create that signature shape and allow the edges to set quickly while the center stays soft. This recipe uses six 4-ounce ramekins. Before you mix batter, it’s worth taking a few minutes to prep the baking vessels carefully; it’s one of the main factors that determines whether the cakes release cleanly when you unmold them.
Start by greasing the ramekins generously with butter. Then coat them lightly with flour and shake out any excess. That butter-and-flour layer acts as insurance against sticking, especially important if you plan to invert each cake onto a plate.
Just as important: get the oven preheating early, and set it to 450 F. Rosenhouse emphasizes that while the temperature may seem high, it’s essential for the molten effect. The cakes need a burst of heat so the outside sets before the centers lose their gooey texture. In other words, the heat is not a detail—it’s the mechanism that makes “lava” possible.
Step-by-step method: from batter to molten center
The process can be thought of in three stages: preparing the ramekins, building the batter, and timing the bake so the edges set while the middle remains soft. Here’s the streamlined workflow described in the recipe.
- Prepare the ramekins: Grease six 4-ounce ramekins generously with butter, coat lightly with flour, and shake out excess.
- Make the chocolate mixture: After heating, take the pan off the heat, add the chocolate and vanilla, and stir until smooth. Set aside.
- Whip the eggs and sugar: Beat the eggs and sugar until thickened and doubled in volume.
- Combine gently: Fold in the chocolate mixture, 3 tablespoons of flour, and salt until uniform.
- Portion: Divide the batter between the ramekins.
- Bake: Bake for 10–12 minutes, or until the edges are set but the centers are slightly jiggly.
- Plate (optional): While the cakes bake, prepare plates with chocolate hazelnut spread, fruit coulis, or other sauces, as desired.
- Unmold: Flip one ramekin at a time onto plates and unmold. If needed, run a small paring knife around the edges to loosen.
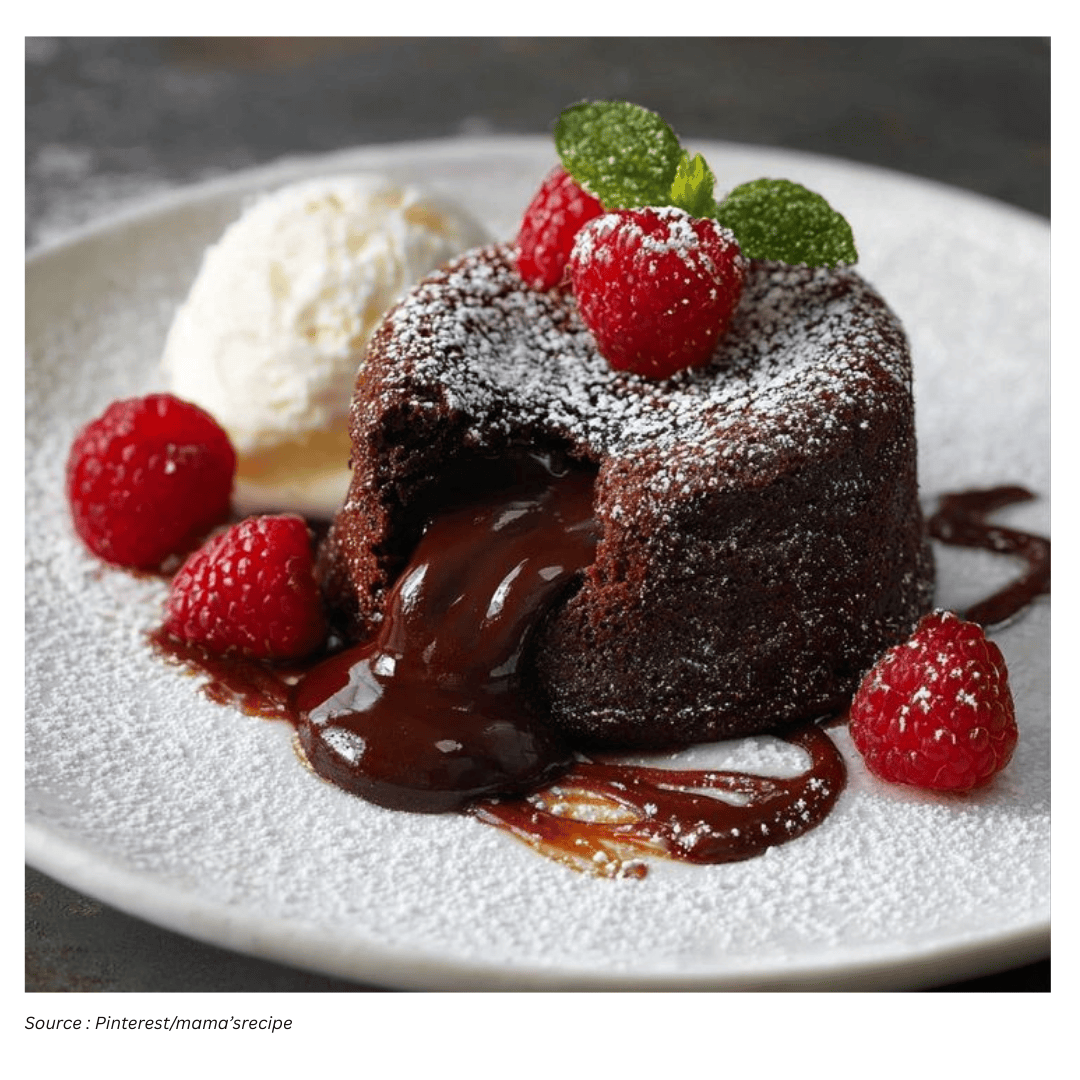
- Finish: Dust with confectioners’ sugar and garnish with berries and ice cream, if desired.
That’s the core of it: whip, fold, portion, bake briefly at high heat, then serve immediately. The dessert’s “wow” factor comes less from complicated technique and more from timing and temperature.
Timing cues: how to know when they’re done (and still molten)
The defining challenge of molten lava cake isn’t mixing—it’s pulling the cakes at the right moment. Bake too little and the cakes may be overly loose; bake too long and the center can set. Rosenhouse’s guidance focuses on clear visual and practical cues.
Look for edges that are set while the centers remain slightly jiggly. If you use a toothpick, the placement matters: inserted around the edge, it should come out clean when the cakes are ready. Inserted into the center, it should still be wet, and that’s exactly what you want for the lava effect.
Because the bake time is short—about 10 to 12 minutes—staying close to the oven during the final minutes helps. This is a dessert where a small timing difference can change the texture, so it’s worth treating the last stretch as an active step rather than a “set it and forget it” bake.
Unmolding without stress: preventing sticking and backup options
Unmolding is the moment that can make home cooks nervous, especially if you’re aiming for a clean, plated presentation. The best defense is proper ramekin prep: generous buttering and a light flour coating. If the cake still clings, the recipe suggests running a small paring knife around the edges to loosen it before inverting.
And if you’d rather skip the risk altogether, there’s an easy alternative: serve the cakes directly in the ramekins. The dessert remains just as warm and gooey, and you can still add confectioners’ sugar, berries, or ice cream on top.
The key technique: fold gently to protect the batter’s structure
Rosenhouse notes that much of the cakes’ structure comes from the whipped egg mixture. That’s why the folding step matters: you want the batter to stay airy enough to bake properly, but you also need it evenly combined.
Her advice is to fold gently to avoid deflating the whipped eggs, but keep going until the batter is uniform in color before you portion it into the ramekins. In practice, that means using a light hand and stopping as soon as the mixture looks consistent—no streaks of chocolate, no pockets of unmixed ingredients.
Flavor variations: keep the molten method, change the personality
One reason molten cakes are so adaptable is that the method stays the same even when you change the flavor profile. Rosenhouse’s version spotlights bittersweet chocolate, but she suggests several ways to adjust the taste without changing the overall approach.
- Change the chocolate intensity: For a more bitter flavor, use darker chocolate (70% and up). For a sweeter finish, choose milk chocolate.
- Swap or add flavoring: Vanilla bean paste can be replaced with espresso powder, orange zest, or a splash of Grand Marnier or bourbon for a boozy note.
- Add spice for depth: Cinnamon, nutmeg, or chile powder can bring a spiced twist while keeping chocolate as the star.
These options make it easy to tailor the dessert to the rest of the meal or to personal preferences. Espresso powder can lean into a mocha direction; orange zest can brighten the chocolate; warm spices can make the cakes feel more aromatic and layered.
A practical “lava insurance” hack: truffles in the center
Even with good timing, it’s natural to worry about overbaking—especially if you’re making molten cakes for the first time or if you’re juggling other parts of a meal. Rosenhouse offers a simple hack designed to protect that gooey center.
The idea is to freeze store-bought truffles until firm, then press one into the center of each cake right before baking. The truffle can be any type you love—caramel, white chocolate, peppermint, and more. The benefit is twofold: it helps ensure a wet, lava-like center even if the cakes bake a few minutes too long, and it can add an extra layer of flavor.
It’s a small addition that can make the outcome more forgiving, particularly when you’re serving guests and want consistent results across all six ramekins.
Serving suggestions: simple or plated, both work
Molten lava cakes are satisfying on their own, straight from the oven, but the recipe also outlines easy ways to make them feel like a composed dessert course. You can prep plates while the cakes bake, spreading chocolate hazelnut spread, fruit coulis, or other sauces as a base. Once the cakes are unmolded, finish with a dusting of confectioners’ sugar, fresh berries, and ice cream if you like.
Because the cakes are individual servings, they naturally lend themselves to a more polished presentation. Yet they’re also flexible: you can keep the garnish minimal for a casual night in, or add the sauces and toppings when you want the dessert to feel more celebratory.
Why the high heat matters—and why this recipe stays approachable
Molten cakes can look like a technical baking project, but the recipe’s logic is straightforward. The oven is set to 450 F so the edges set quickly, protecting the molten interior. The ramekins are buttered and floured so the cakes release cleanly. The eggs and sugar are beaten until thickened and doubled, then folded carefully with the chocolate mixture, flour, and salt to keep the batter light.
From there, success comes down to watching for the right doneness cues: set edges, a slightly jiggly center, and the toothpick test that’s clean at the edge but wet in the middle. With those checkpoints in mind, the dessert becomes less intimidating and more like a reliable, repeatable technique you can bring out whenever you want a rich, chocolate-forward finale.
Final takeaway
Chocolate molten lava cakes deliver exactly what their name promises: a warm cake with a luscious, chocolate-oozing center. They’re ideal for romantic dinners and special occasions, but they’re also practical for entertaining because the recipe yields six portions and uses a manageable list of ingredients. With a properly preheated 450 F oven, well-prepped ramekins, gentle folding, and careful timing, you can serve an impressive dessert that feels extravagant without being overly complicated.